Showing posts with label tutorial. Show all posts

Thursday, August 27

Easy Applique Tutorial


As I was adding applique balloons to my Party Bear Embroidery,  I thought I'd make a quick tutorial for easy applique. It's really an applique tutorial for embroiderers-that-don't-sew. Combining applique and embroidery can give such fun results and it's very easy to do, even if you don't have any sewing tools or materials. I used some materials from my sewing cabinet for the tutorial but I will suggest alternative supplies that most embroiderers have in their tool kit. And yes, I know 'applique' is spelled with an 'acute accent' but I can never find those quickly enough on my keyboard! (Tips are welcome)

Supplies


For applique I use:
- Fabric to sew your applique on (obviously!).
- Fabric for your applique
- Heat 'n Bond Iron-on adhesive (or a pin)
- Scissors
- Needle (regular sewing needle or small crewel embroidery needle)
- Thread (or Embroidery Floss)

Attaching applique to fabric


You can simply cut out the applique shape you want and temporarily attach it to fabric with a pin. However,  I almost always use Heat 'n Bond because it holds your applique perfectly in place which makes the end result neater. It's an iron-on adhesive that you use on the back of your applique fabric. Iron on the Heat 'n Bond, making sure the side that feels rough is facing the wrong side (back) of your applique fabric. You can either cut the shape you need from the Heat 'n Bond paper before you iron it onto the fabric. Or you can cut out the shape afterwards (which is what I did). Put an old tea towel underneath to be completely sure the adhesive doesn't stick to your ironing board. 

Peel off the paper and you end up with an applique with a sticky backside. Put the applique glue side down, onto fabric and iron it on. It's a really quick method and it probably takes more time to read my instructions than to prepare your applique piece this way. :)

There are more complex ways of preparing an applique, where you fold sides under so you are not left with unfinished edges on your fabric but as this is an Easy Applique Tutorial we are going to leave the sides as they are. So please know that depending on the fabric and whether you use and adhesive the fabric can unravel a bit. The Liberty fabrics I used on the blue balloons didn't unravel at all but the quilt fabric I used for the lighter balloons did look a bit rougher on the edges. That is, before I used the Blanket Stitch to sew around the balloons. 

Sewing the applique on


I like to use Blanket Stitch to sew appliques onto fabric. It's a versatile, decorative stitch that is also used in embroidery. It's also a nice way to finish your unfinished fabric edges.


Let the needle and thread come up on (not through) the edge of the applique fabric (A) and insert it into the fabric at B, diagonally from the point where the needle came up first. 


Pull needle and thread through, but not entirely. Make a loop, and let the needle come up again from underneath, through the base fabric (not the applique fabric) at C


Pull needle and thread through and you've made the first blanket stitch! Continue all the way around the shape. The next step is to make the diagonal stitch again, then the loop etc etc. To follow the curves of a shape neatly with your stitches, take care not to make space between stitches too wide.


You should end up with something like this! I hope this tutorial was useful to you. If you have any questions let me know....You can find the Party Bear Embroidery Pattern in my shop. :)


Friday, January 3

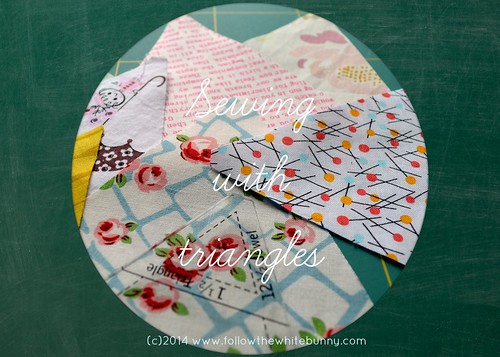
Sewing with Triangles

triangleblogpostmain

Happy New Year everyone!

I probably should have called this post 'Sewing with 60 degree Triangles with one Flattened Point' but that isn't quite as catchy as Sewing with Triangles (which to me sounds a bit like Dances with Wolves except it isn't quite as dramatic) 

So I treated myself to a new quilt ruler recently called Hexn'more designed by Julie of Jaybird Quilts with which you can cut Hexagons, Jewels and...Triangles! I saw some really neat triangle quilts on Flickr and Pinterest and as I ordered a Low volume Fat Quarter bundle alongside my ruler  I thought I would have a go at making a Low Volume Triangle Quilt! 

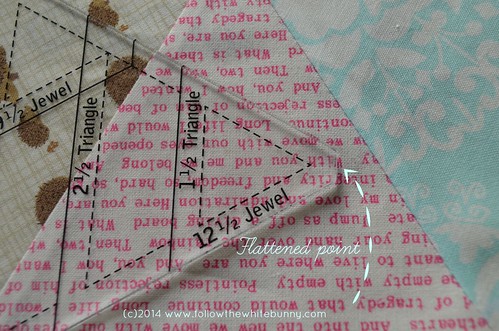
traingleruler

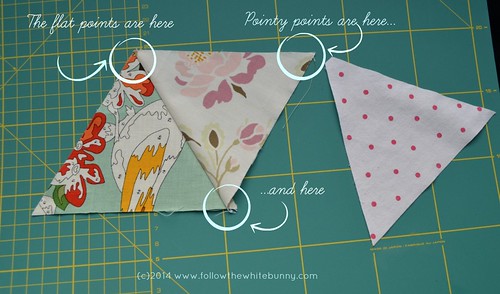
Now the new ruler did have a leaflet explaining how to cut fabric using the ruler and how to sew together different shapes but I couldn't find information on how to simply sew two (or more) triangles. The triangles have two pointy and one flattened 'point' which was where I got confused. (I get confused easily with quilting stuff). A call out on Twitter and googling didn't help but I figured it out eventually. It's very likely that for most people it is obvious how to sew triangles with a flattened point together and I know it isn't exactly rocket science but I'm posting this tutorial anyway as I assume there are people out there who, like me, are easily confused and because sewing triangles is perfect for beginners and the following might be helpful too, even if you are sewing with 'regular' triangles (which is even easier!) 

triangle2triangles

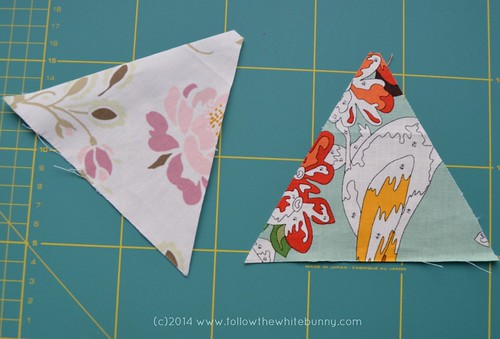
So you start with two triangles with each two pointy points and one flattened point.


triangles2

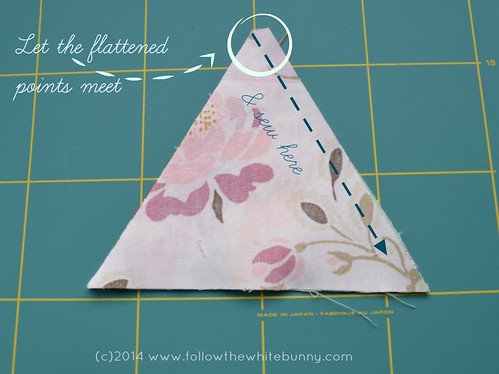
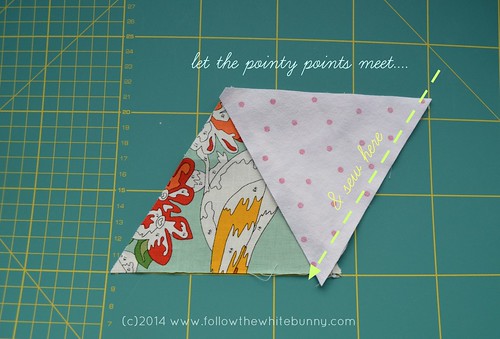
You put them right (pretty) sides together (on the photo you see the back of one of the triangles) and sew with a 1/4 of an inch seam allowance

triangle3

Fold open and press. Then put your next fabric triangle on top of the previous one, again right sides together.

triangle5


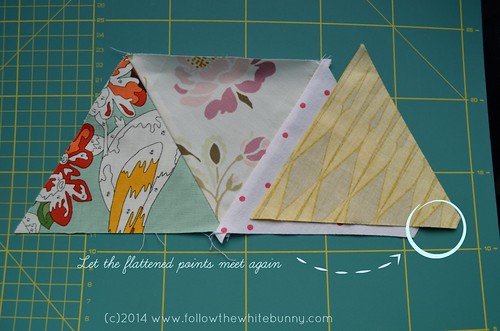
This time you make sure the pointy points of the second and third triangle match.

triangle6

And so on and so forth...

trianglessewntogethercheck

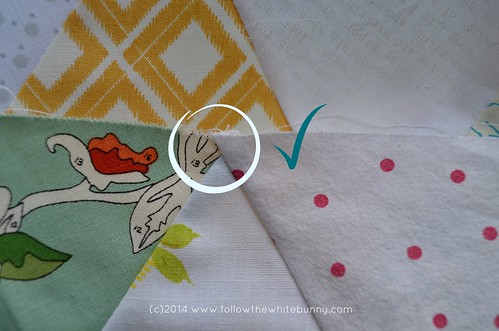
The sewn together triangles should look something like this when you are done. The overlapping bit will disappear into the seam allowance when you sew your rows of triangles together! 

I hope this was helpful! I'm making a huge bed throw using my Fat Quarter bundle of Low Volume Fat quarters, scraps, long time fabric stash dwelling fabrics and even (the dotty fabric you see above)  an old duvet cover. My triangles are 4,5" high (measured from base till point). I will keep you up to date with the progress. :) 

Sunday, September 1

Stem Stitch Tutorial


Recently I checked numerous online tutorials as well as my embroidery handbooks for the Stem Stitch. Like I wrote in my last post: I was never 100% happy with how my Stem Stitch turned out so I thought I would check whether (and where) there was room for improvement by re-mastering the stitch. It seems to me the Stem Stitch can be explained in many different ways, some will 'click' with you and some don't. The Stem Stitch tutorial I'm sharing with you, is the one that makes most sense to me and indeed did improve how my Stem Stitch looks!

Note that I'm left-handed (so the photos are of the left-handed version of the stitch) but that really does not matter much for understanding the key points of making a successful Stem stitch. However I've added a 'right handed' photo at the end of the tutorial (which is actually an upside down photo of my left-handed stitch) just in case you right-handers need some extra help understanding :)  Also: in my photos I've made larger 'loops' with my floss than I normally would to make things more clear.

Ok this is how I make my Stem Stitch:


Here's where I have improved. For some reason I often let my needle emerge in the middle between the stitches not right at the end of the previous stitch!


For you right-handed stitchers: 


I hope this tutorial will improve your Stem Stitch too! And if you feel the need to practice why not check my shop for a cute pattern? If you use code LEARNWITHBUNNY for a 25% discount on all my patterns. The code is valid until September 7th 2013 :)

Happy Stitching everyone!

Monday, August 27

Simple shading in embroidery tutorial


If you haven't tried shading in embroidery yet hopefully this tutorial will inspire you to take the first steps. Note that this tutorial shows how to simply use shading in a cloud (with round shapes). For other shapes and things (like animal furs or flower petals for example) other shading techniques are probably more appropriate, but that's for another time! :) With this tutorial I provide a simple pattern of a cloud. You can download the free pattern here.


The pattern is called Happy when it rains partly a reference to this song and partly because I plan to stitch the drops in happy colours (see photo above). If you decide to link to this tutorial or the pattern please refer to this blog post. Thank you!


This piece I'm working on, and especially the clouds behind the rabbit, was what inspired me to do this tutorial. I have tried to keep the tutorial short, if you have a question please let me know in the comments and I will answer it (for the benefit of all) in the comments as well.

So last week I did a call out if anyone was interested in stitching along with me (my cloud isn't finished yet either!) and a lovely bunch of blog readers have said they would try their hand at stitching a shaded cloud too. For them and for everyone else who decides to play along: please post your WIP's, finished clouds, experiments with shading in my Flickr group here. There are no deadlines but I'm thinking of awarding one voucher for my shop if really nice clouds are posted. :)


Things you need to stitch this cloud...


This is the stuff you need to start with your cloud embroidery (besides the printed pattern): A hoop, fabric, a water disappearing pen, an embroidery needle (size depends on how many strands you plan to use) and four shades of floss. You will also need some 'happy' floss for the drops (example pictured in the top photo) Obviously you will also need embroidery scissors :)

I transferred the pattern to the fabric by sticking the print to a window, put my fabric on top and traced the design with a water soluble pen. The Prym Aqua Trickmarker (fine line) is one of my favourite pens to use.


I wrote a bit about how to select your shades here but basically you take a dark, medium and light shade of one 'colour family'. These three shades should be enough to get a nice effect in your shading. Add white floss as well. I used DMC Mouline (six stranded) floss: Blanc, 169, 762 and 3799.

Starting your embroidery


You start by stitching the outline of the cloud with a back stitch. I used two strands of (six stranded) floss. You could use any number of strands but I'd recommend no more than three strands for this small project. Only one strand would be awesome too (which is what I'm doing in the Rabbit embroidery).  Less strands means a more subtle shading effect. I stitched the outline with all three shades of grey: a chunk of the dark grey here some of the medium grey there etc.

Simple shading example 


To show more clearly how shading works I stitched an example with six strands of floss. Again I wouldn't normally advise to use that many strands, unless you are making a HUGE embroidery that is. ;)


Along the curve of one of the parts of the outline I added a line of back stitches in dark grey. I think it is essential for effective shading to follow the shape of whatever your stitching. I started this top line of stitches a bit further from where the outline started and with the next line a bit further still. Also note that as I go along I'm not even 'connecting' the back stitches anymore. This is because I plan to add medium grey colored stitches in the gaps I leave. I'm gradually phasing out the dark grey and introducing the medium grey.


So basically as the number of darker stitches decreases, the number of medium coloured stitches increases. The same goes for your shading from the medium colour to the lightest shade of grey and for the lightest shade to white.

You don't need to pay much attention to where you place your stitches as long as they are following the shape. They don't have to be stitched along an exact (curved) line. As to the length of the stitches: don't make them too small and not too long either, but you really don't have to worry about a little variation in the length of your stitches.

shading with 2 strands and 4 shades

Movement and subtle colour additions

It's an option to stitch this cloud by shading near the outline and simply filling in most of the middle bit with white floss. If you want to add a little bit more 'lively-ness' and texture to your cloud however try adding the following two things to your piece: movement and subtle colour variation.

Add swirly stitching to your piece!

To add movement let your stitches make a flowing shape. Think a swirly long shape for example (see picture above). Even with using only one colour (white for example) this will add movement to your piece.


Blending in a subtle colour addition will make your embroidery come to live even more. In my cloud I used some of those swirly stitches in the lightest shade of grey and even added a couple of small stitches in the medium grey colour. 

After you have finished fill stitching the whole cloud, stitch the eyes with a few simple back stitches on top of your fill stitches. 

After that it's time to move on to the drops! I'm going for some happy coloured drops (see top photo) using a satin stitch. So far I selected DMC Mouline floss:  720, 725, 834 and 3848. I will post an update of my own cloud (and drops) on this blog soon!

A few final words...


If you choose to use more shades (and only one strand of floss) the effect will be definitely be smoother. However in my experience it's not effective to use too many shades or shades that are too similar. Especially not if you are working on a (relatively) small sized project.

Hope you enjoyed this tutorial! Don't forget to share your own clouds in my Flick group here

Saturday, March 17

Bullion Knot Tutorial (my way)

The Bullion Knot is a fun stitch to have in your stitch repertoire. I especially like to make cute (slightly kitschy) roses with them. Now the Bullion Knot is feared by some stitchers but it's really not an incredibly complicated stitch to learn. I'm not claiming that my Bullion Knots are perfect, and I'm the first one to admit that the way I make them is a bit awkward but I hope this 'how to' will help one or two stitchers out there to overcome their fear of Bullion Knots! In a next tutorial I will show you how I make my Bullion Knot roses.


Milliners needles will make it easier for you to make a Bullion Knot (and French Knots as well). The eye of a Milliners needle is just as narrow as the shaft which makes it easier to pull through when you are making the actual 'knot'. Milliners needles are also longer than regular needles which makes wrapping your thread around the needle easy peasy. Now if you don't have a Milliners needle at hand, don't worry I have made Bullion knots with other types of needles too. Just make sure the needle isn't too short or has a 'bulky' eye.

So here's how you make a Bullion Knot.  I used the (hopefully) best photos from different Bullion Knots I made, hence the different floss colours. Hope it's not too confusing! I'm also a left-handed stitcher but as far as I can tell that really has no impact on how to perform this particular stitch. :)


Let the thread come up at A. The next step is to insert the needle at B ( and let it come up again at C.  Hold the eye-end of the needle down with your thumb so the upper bit of the needle comes up and start wrapping the thread (that comes up at A) around the needle 4-6 times (to start with) clockwise.


You can see that the Bullion Knot is already taking shape. It is now time to pull the needle through. Try to keep some tension on the thread that is on the right of your needle but not too much or you will have trouble pulling your needle through. Not enough tension and you may end up with something like this...


Eeeep! Where is my Bullion Knot? Don't worry,  keep on pulling the needle through gently and when you are nearly done, ease down the loops with your thumb and index finger....


...and it should then end up looking something like this. To secure the knot insert the needle at B again.

Here are some Bullion Knots I made earlier...
Now if you want to make a curved Bullion Knot (which is handy if you want to make Bullion Knot roses for example) you need to increase the number of wraps around the needle while keeping the distance from A to B (or B to C) the same as with the regular Bullion Knot.


Mmm in yellow they look a bit like maggots to me!
The more wraps the curvier your Bullion Knot will be! I exaggerated a little bit to show a really curvy Bullion Knot and wrapped the thread about 15 times around the needle. To make a Bullion Knot Rose you will probably be better off with a little less curvy Bullion Knot.  I will show you how to make Bullion Knot Rose in a next tutorial!

Let me know how you get on the with the Bullion Knot


Thursday, May 7

My embroidery 'un paperbag'

About a year ago I made the bag you can see here on the left cleverly displayed on Luna's scooter. It's based on a Purl Bee tutorial and it's called the Unpaper bag. I love the Unpaper bag especially it's 'boxy bottom' . The bag on the photo is a rather cheap version made with Ikea fabric as outer fabric (I still have A LOT of that fabric by the way, it was on sale when it went out of their fabric collection) and twill tape handles. Usually store bought bag handles -plastic, bamboo and most of all leather- are rather expensive and this works fine for me. Baghandles would make the bag look more classy I suppose. My Unpaper bag is now my embroidery bag but I'm sure it is a great bag to hold other crafty stuff too. I made two other Unpaper bags after this one, both to hold several smaller gifts. My bag looks a bit floppy, that's because it is a bit floppy. Instead of interfacing I used an extra layer of cotton fabric which I thought would do the job. A thicker outer fabric would probably help too.

Many thanks to everyone who has responded to the giveaway and the freebie pattern. Just to be clear: the giveaway is really only 1 fat quarter and several smaller pieces of fabric. And the gorgeous ricrac of course. I thought maybe some of you were under the impression that there were several fat quarters...